The Core Build

The Core Build is the first step of any Transit or Sprinter build. It all starts with our Smooth Rail Mounting System. A core build can be a standalone project, or the first step of a full build in a multi phase incremental buildout allowing the customer to finish their van in phases.
- Sometimes customers like having Roost’s professional installers do the bare metal vehicle work, allowing them to conduct other portions of the build more on a DIY basis (projects more suited to their talents and available tools).
- Other times it can be helpful to take an incremental approach, allowing a new van owner to use the van a little before making decisions about the final layout or placement of key features.
- And other times, our clients prefer to have us conduct the entire build, utilizing our capable, professional installers to position cabinetry and appliances. This can be done all at once, or in multiple phases.
Whether for budgetary or scheduling reasons, Roost works hard to meet the diverse needs of our clients. Our core build system has been carefully designed to maximize flexibility, versatility, and forethought, offering a cohesive build solution to accommodate any van owners individual goals.
Core Build Details
Below is a list of each element of a typical core build. Click each one for more details and basic pricing information.
1 - Interior Mounting System
Mounting system after paneling installed
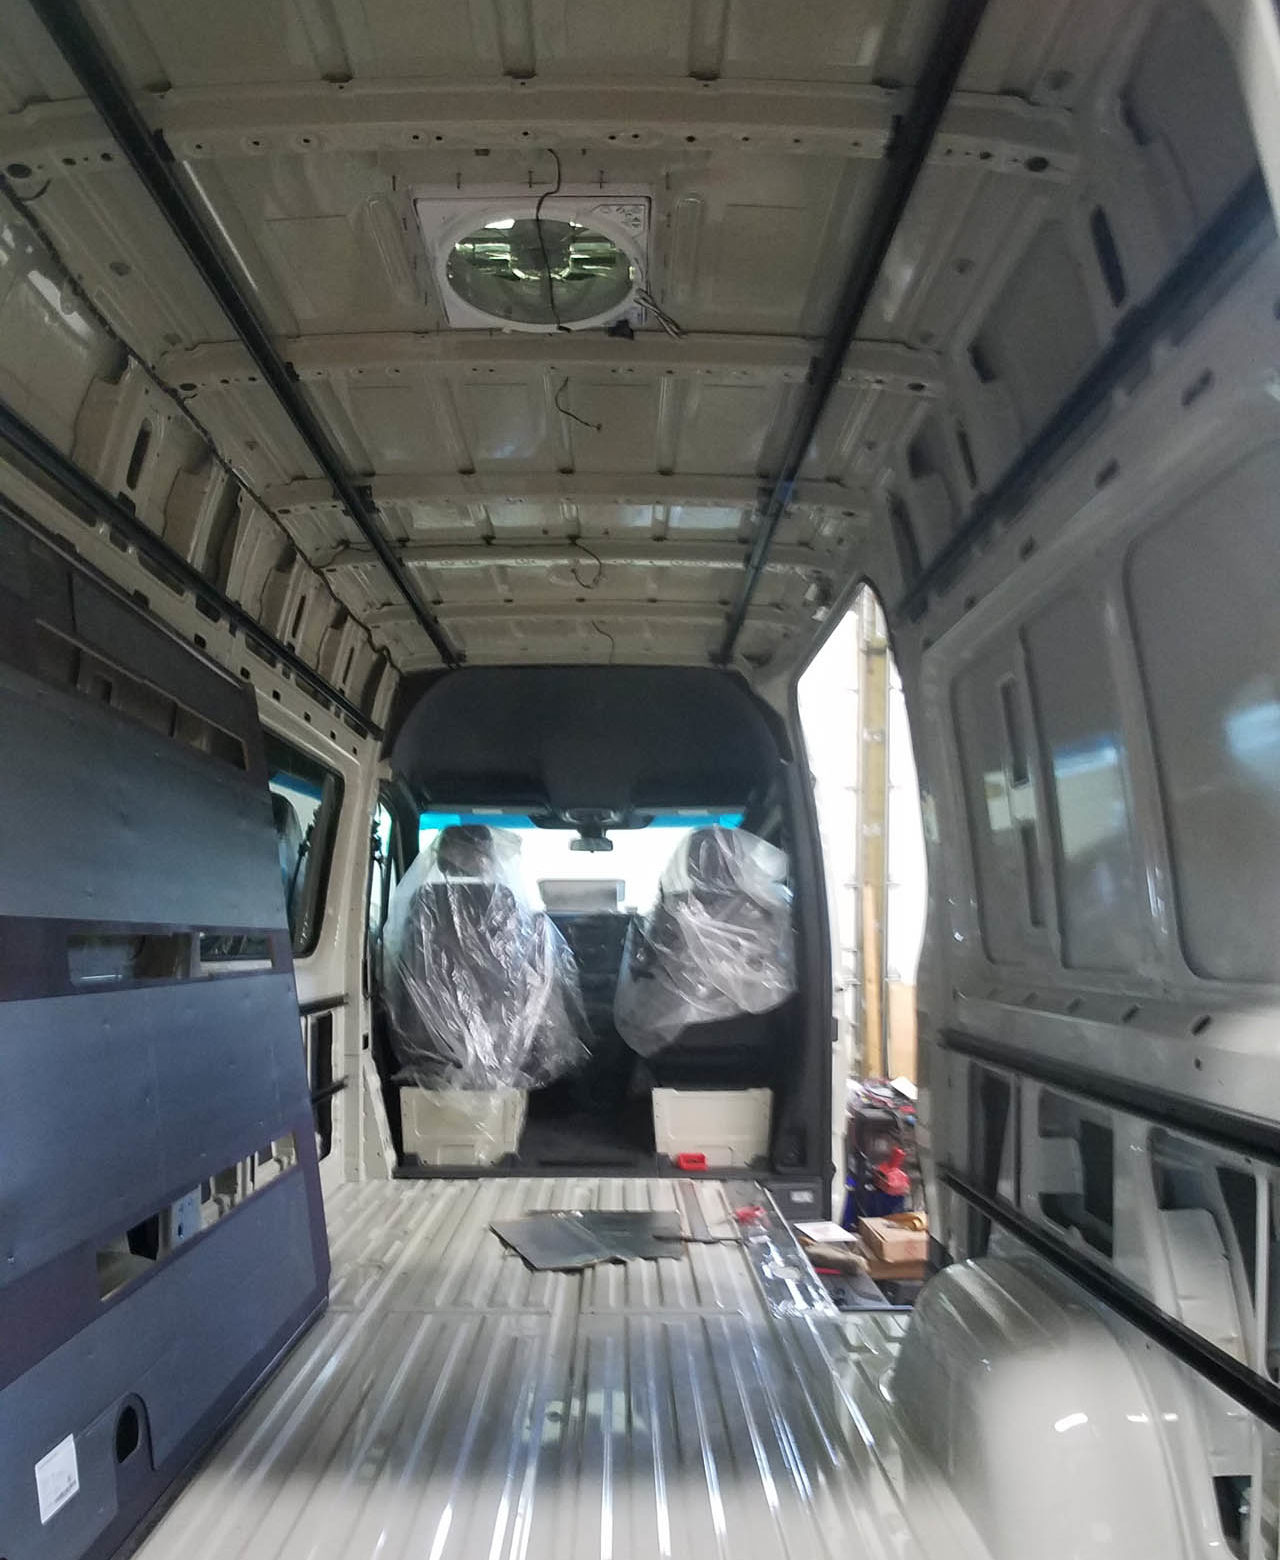
Mounting system before insulation and paneling installed
About:
The foundation of our modular approach to van building is our Smooth Rail Mounting System. This provides a permanently accessible, strong and secure mounting point most van build components and accessories. Components installed to our mounting system can be installed, temporarily removed, or re-positioned without the need to remove paneling or drill additional holes in the ribbing or pillars of your van. The smooth slide action of our system allows for precise positioning of components, whether to flush mount two or more cabinets, or a precise gapping between them. Most components can be removed or replaced in minutes with simple tools.
Standard Package:
Installation of our upper and lower Smooth Rail Mounting System to the interior of the van. Includes ceiling support brackets for increased strength and flex mitigation.
Base Pricing:
- $1875 – Sprinter 144″ or Transit 148″
- $2275 – Sprinter 170″ or Transit 148″ Extended
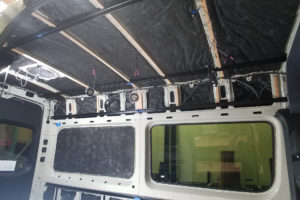
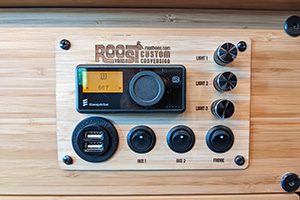
2 - Core Electrical Wiring System
![]()
![]()
![]()
About:
Just like a house, this is the ‘behind the walls’ wiring and ‘circuit breaker box’ for your build. It is critical to install the Core Electric Wiring System properly with forethought of future (often unknown) needs. Best done prior to insulating or installing paneling or other build components. The Roost Vans Core Electric Wiring accommodates the vast majority of applications and uses, as well as anticipating potential future needs and upgrades that we’ve found. The core electrical system consists of Roost Van’s Power Panel, typically located at the C pillar on the driver side. Appropriate gauge wire is routed and run throughout the wall cavities carefully addressing shielding and chaffing points. All the wiring is run from the Roost Vans Power Panel to park power, solar and alternator charge points as well as load (appliance) points. Wiring is connected to the Power Panel, and anticipated unused wiring points are capped and coiled in their respective positions, ready for easy connection later.
Standard Package:
Installation of Roost Vans proprietary Power Panel and Recharge Kit. The main panel of the Power Panel Kit is the hub of your electrical system. It contains a properly fused distribution block for all end use points, as well as solar plug, park power outlet and engine battery plug. The EZ Connect Wiring Harness makes connecting a Power Station a breeze. The switch panel of the Power Panel Kit contains 3 switches and 3 dimmers for user controlled devices, and a dual USB inserted into the DC cigarette outlet.
Load Wiring: Appropriate gauge wire is run from the fused distribution circuits to the load (appliance) locations. This includes lighting, awnings, an option for a bunk heater harness, and several strategically placed auxiliary connection points for misc. future use. There are dedicated ports for the water pump and fridge which is typically wired directly from an adjacent kitchen cabinet. However, we also run a heavy gauge auxiliary kitchen power line to the passenger side to future proof any electric load needs on the other side of the van.
This is a full electrical package for both simple and complex builds.
Base Pricing:
- $3575 – Sprinter 144″ or Transit 148″
- $3775 – Sprinter 170″ or Transit 148″ Extended
Options & Addons:
- Household AC inlet (on Power Panel) & outlet, and any additional outlets: Add $175ea
- DC (cigplug) outlets or Point of Use Task lights: Add $125ea
- Wire upgrade and user kit for shore powered Air Conditioner: Add $575
- Point of Use angle ‘able’ bed fan (Sirocco II) or 2 rows of ceiling lights or ceiling speaker pair: Add $325ea
- Preinstall Espar wire harness (if heater is not already listed to be installed elsewhere): Add $395
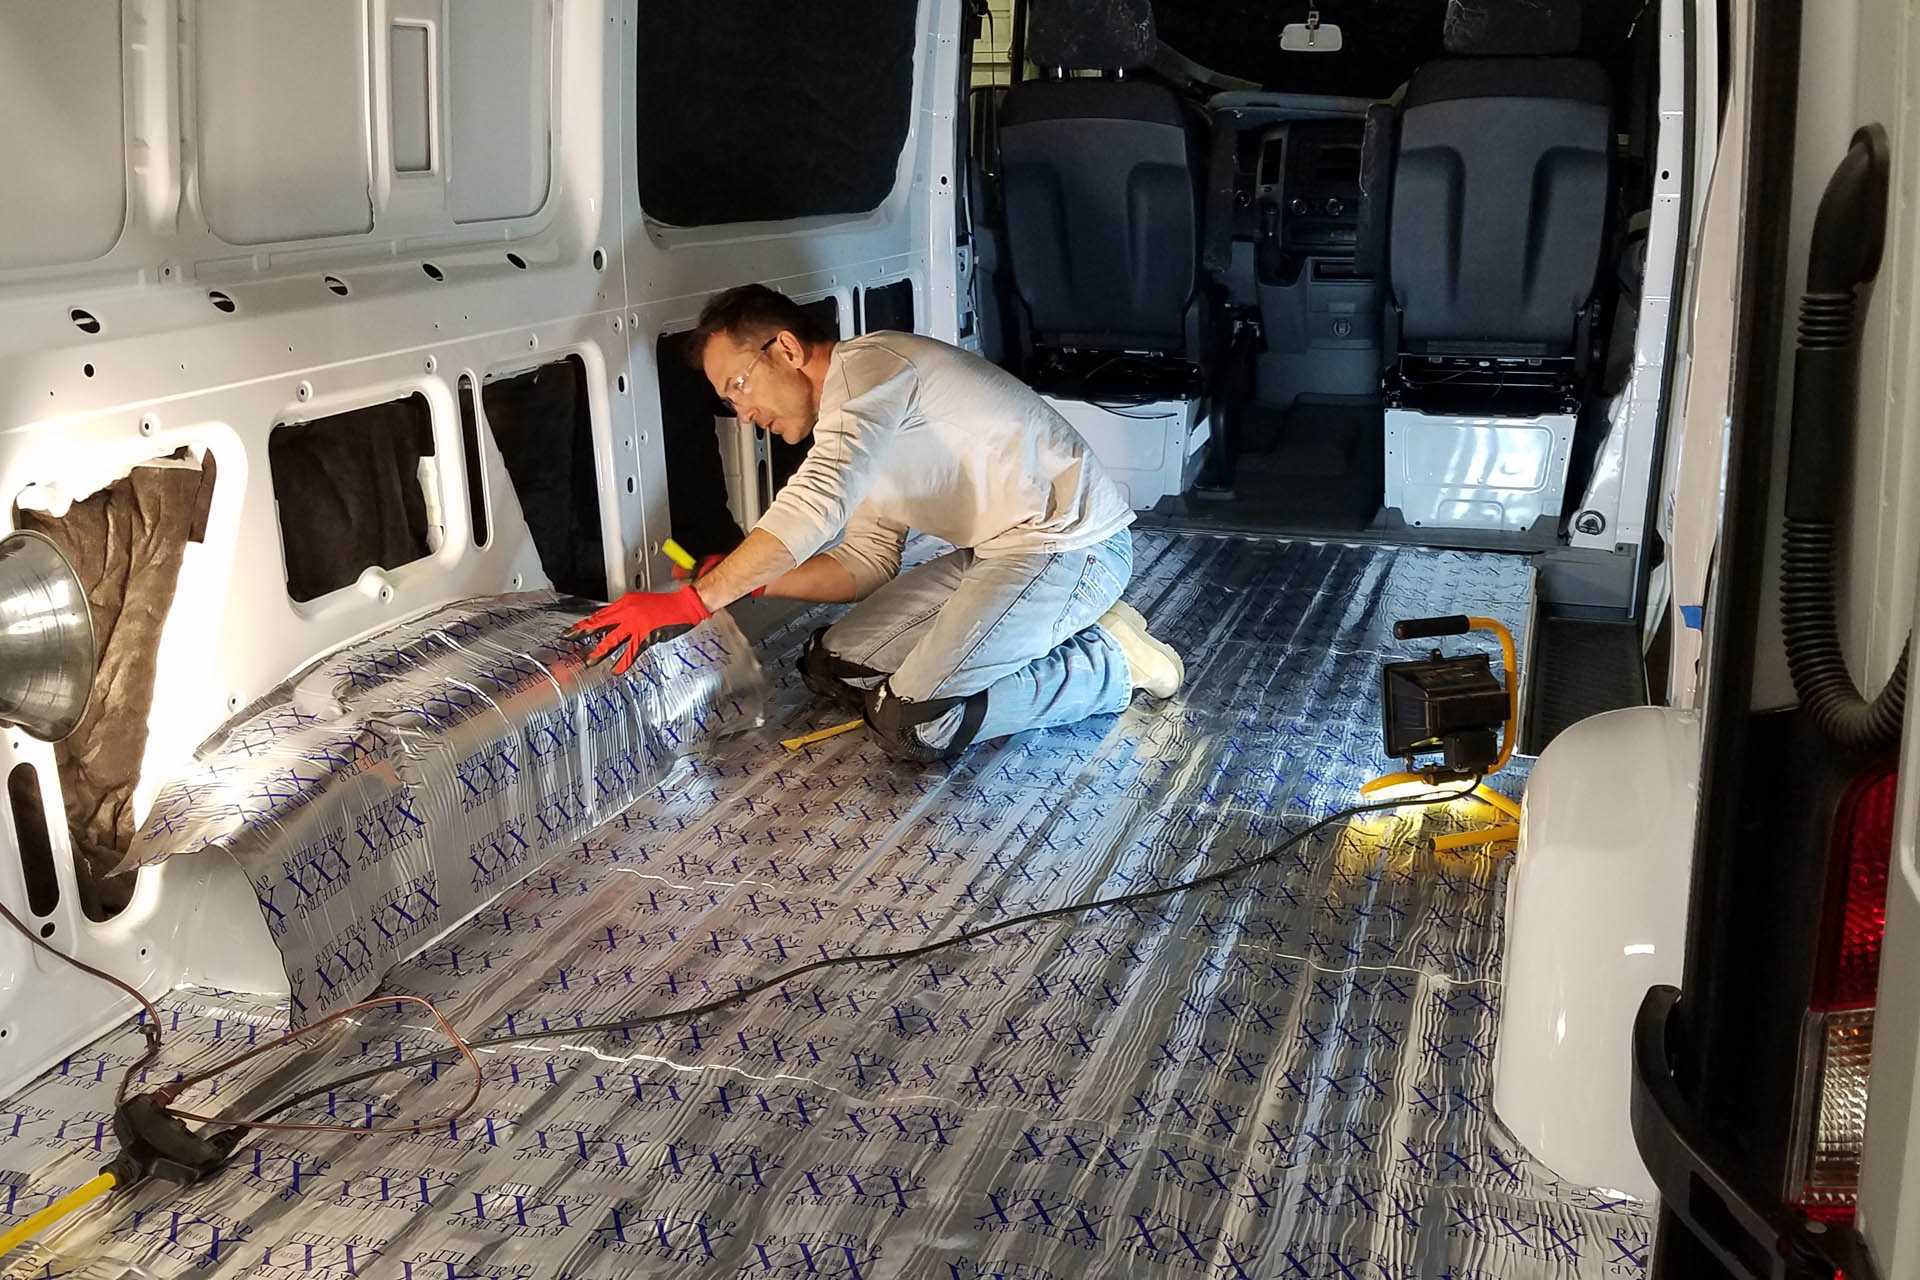
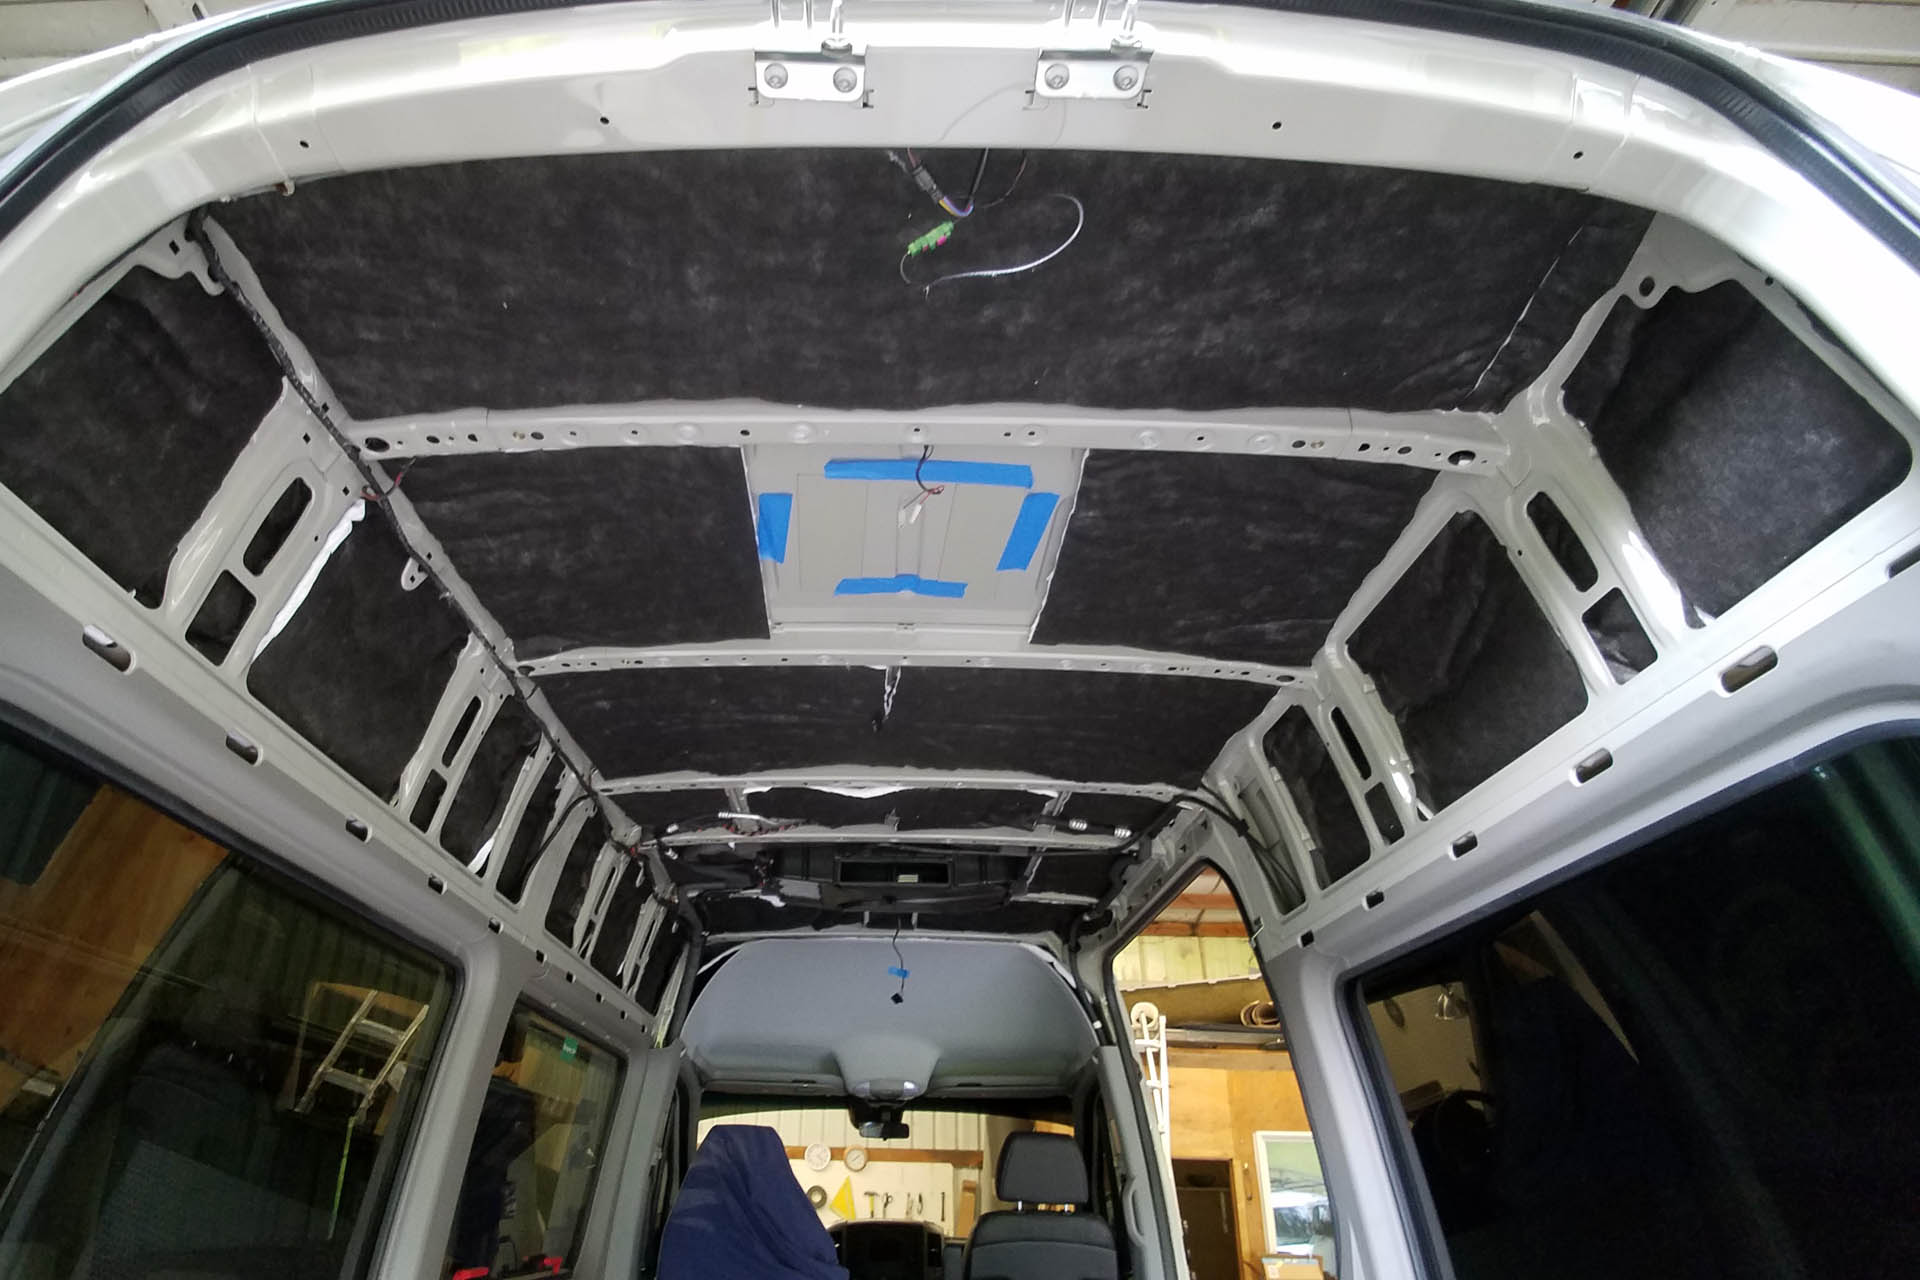
3 - Insulation & Sound Suppression
![]()
About:
Quality thermal and acoustic insulation is very important to the comfort and enjoyment of your home on the roam. Though often overlooked, sound suppression not only gives you a quieter night sleep, but also helps to dramatically reduce the road noise while you are on the move. And of course, keeping the heat and cold out is another big benefit.
Standard Package:
80 mil, mass loaded vinyl is adhered to most exposed metal surfaces as needed to ensure proper coverage and reduce ‘drumming’ of the metal panels while driving down the road. Then, all reasonably possible cavities in the chassis walls, rear door, and slider door are filled with 1.5in 3M Thinsulate adhering where possible. We fill ceiling ribs and most pillars; pull, insulate and reinstall the front headliner; and insulate the passenger sliding and rear doors.
Base Pricing:
- $1750 – Sprinter 144″ or Transit 148″
- $1875 – Sprinter 170″ (Non Extended) or Transit 148″ Extended
Options & Addons:
- $300 for Extended version of 170″
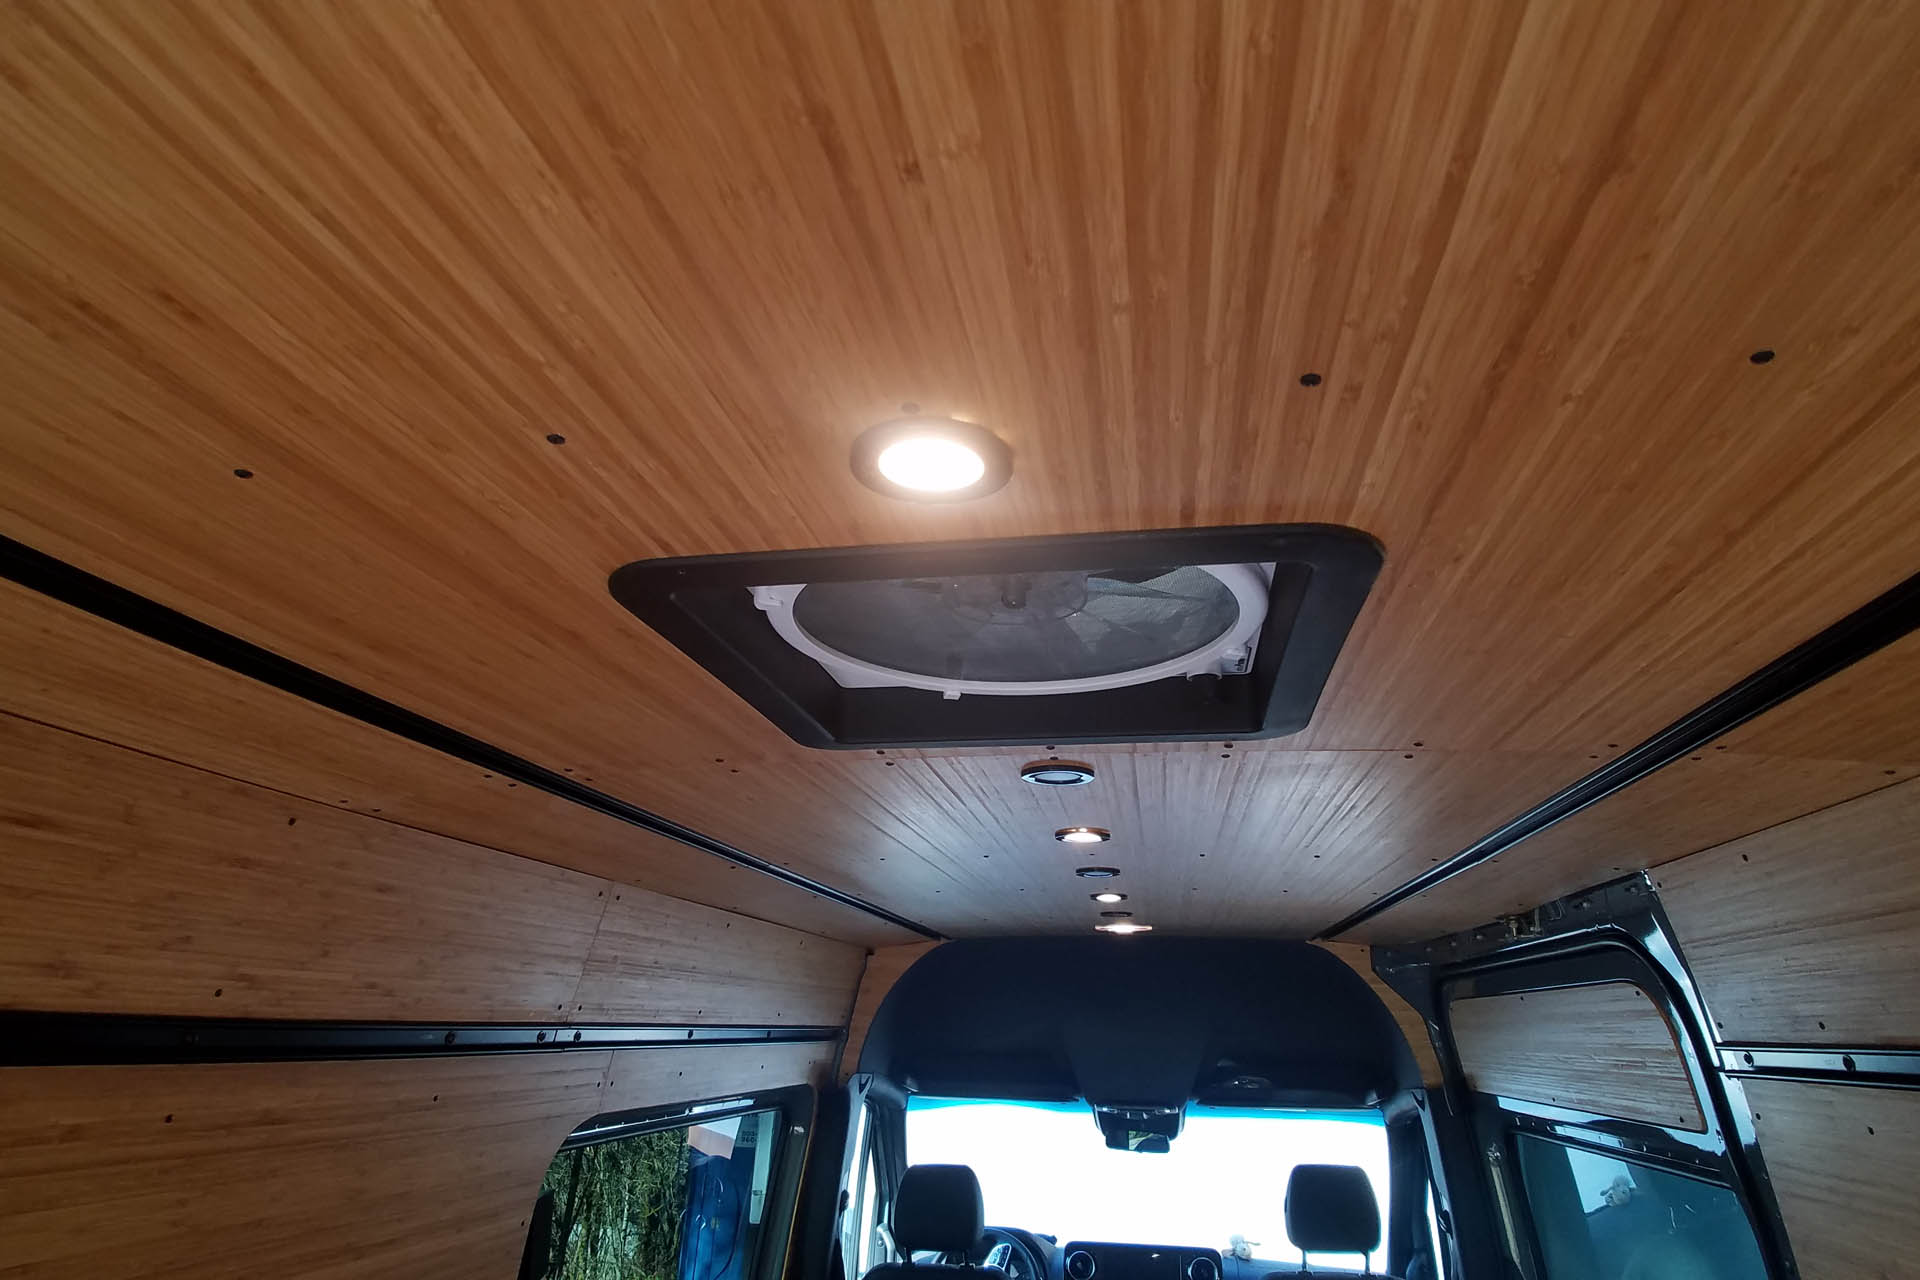
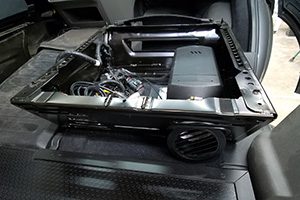
4 - Ventilation
![]()
![]()
![]()
About:
Vent fans are important for proper ventilation of the van. They help remove built up moisture and smell, as well as keep the interior of the van cool in hot weather. The vent fan can be used in the rain, and although not recommended or pleasant, while driving. With the built in thermostat, you can program it to turn on when you’re away if the temperature rises above a set point. Vent fans can be installed in a forward, middle, or rearward location. One is typically sufficient, but some customers prefer two for maximum ventilation.
Standard Package:
We take a double seal approach when installing our vent fans for maximum sealing and longevity. After properly locating and cutting the rooftop egress, a polyurethane adhesive seals the fan to the van roof. Then, a water tight 3M sealing tape further seals around the perimeter. Finally, it’s wired to the pre-existing power system. The interior factory trim ring is trimmed to fit and painted black to match the interior and we add Roost Vans very own Bamboo Vent Fan Trim Ring as standard. The Trim Ring has pockets on rear for insulated fan cover magnet installation if needed.
Base Pricing:
- $995/ea. Installed – MaxxAir 00-7500 Vent Roof Fan with remote control
- Includes Bamboo Vent Fan Trim Ring
5 - Window Installation
![]()
![]()
About:
Installing tinted windows is one of the best ways to increase passive ventilation and give a more finished look to the exterior. It’s also the most powerful tool to create openness inside the confines of a small van. We are asked all the time what our opinion or suggestion is for windows. Our answer? Without a doubt, all windows, all around. Always. Most often our clients use their Roosts for traversing the outdoors and seeing beautiful sights. With windows, it’s easier to see those sights you’re traversing to. By having windows all around, you also have better sight visibility while driving and more natural light while hanging inside on a rainy day. Further reduction of the cost of finishing in the mid wall section of the van can also be achieved. If you’re worried about heat, add a bunk heater and some insulated window coverings. All of our customers who have opted for more larger windows have not regretted it.
Standard Package:
We primarily install AM Auto vented sliding screened and fixed glue in style windows to assure a no leak seal. After all, this is how windshields have been installed for over 50 years. After locating and cutting the holes, the sheet metal is primed and a trim strip installed on the cut edge. Then adhesive is applied and the window is set into position to cure.
Base Pricing:
- $995/ea full size tinted sliding screened window
- $895/ea full size tinted fixed window or screened pill window
- 750/ea rear door tinted window
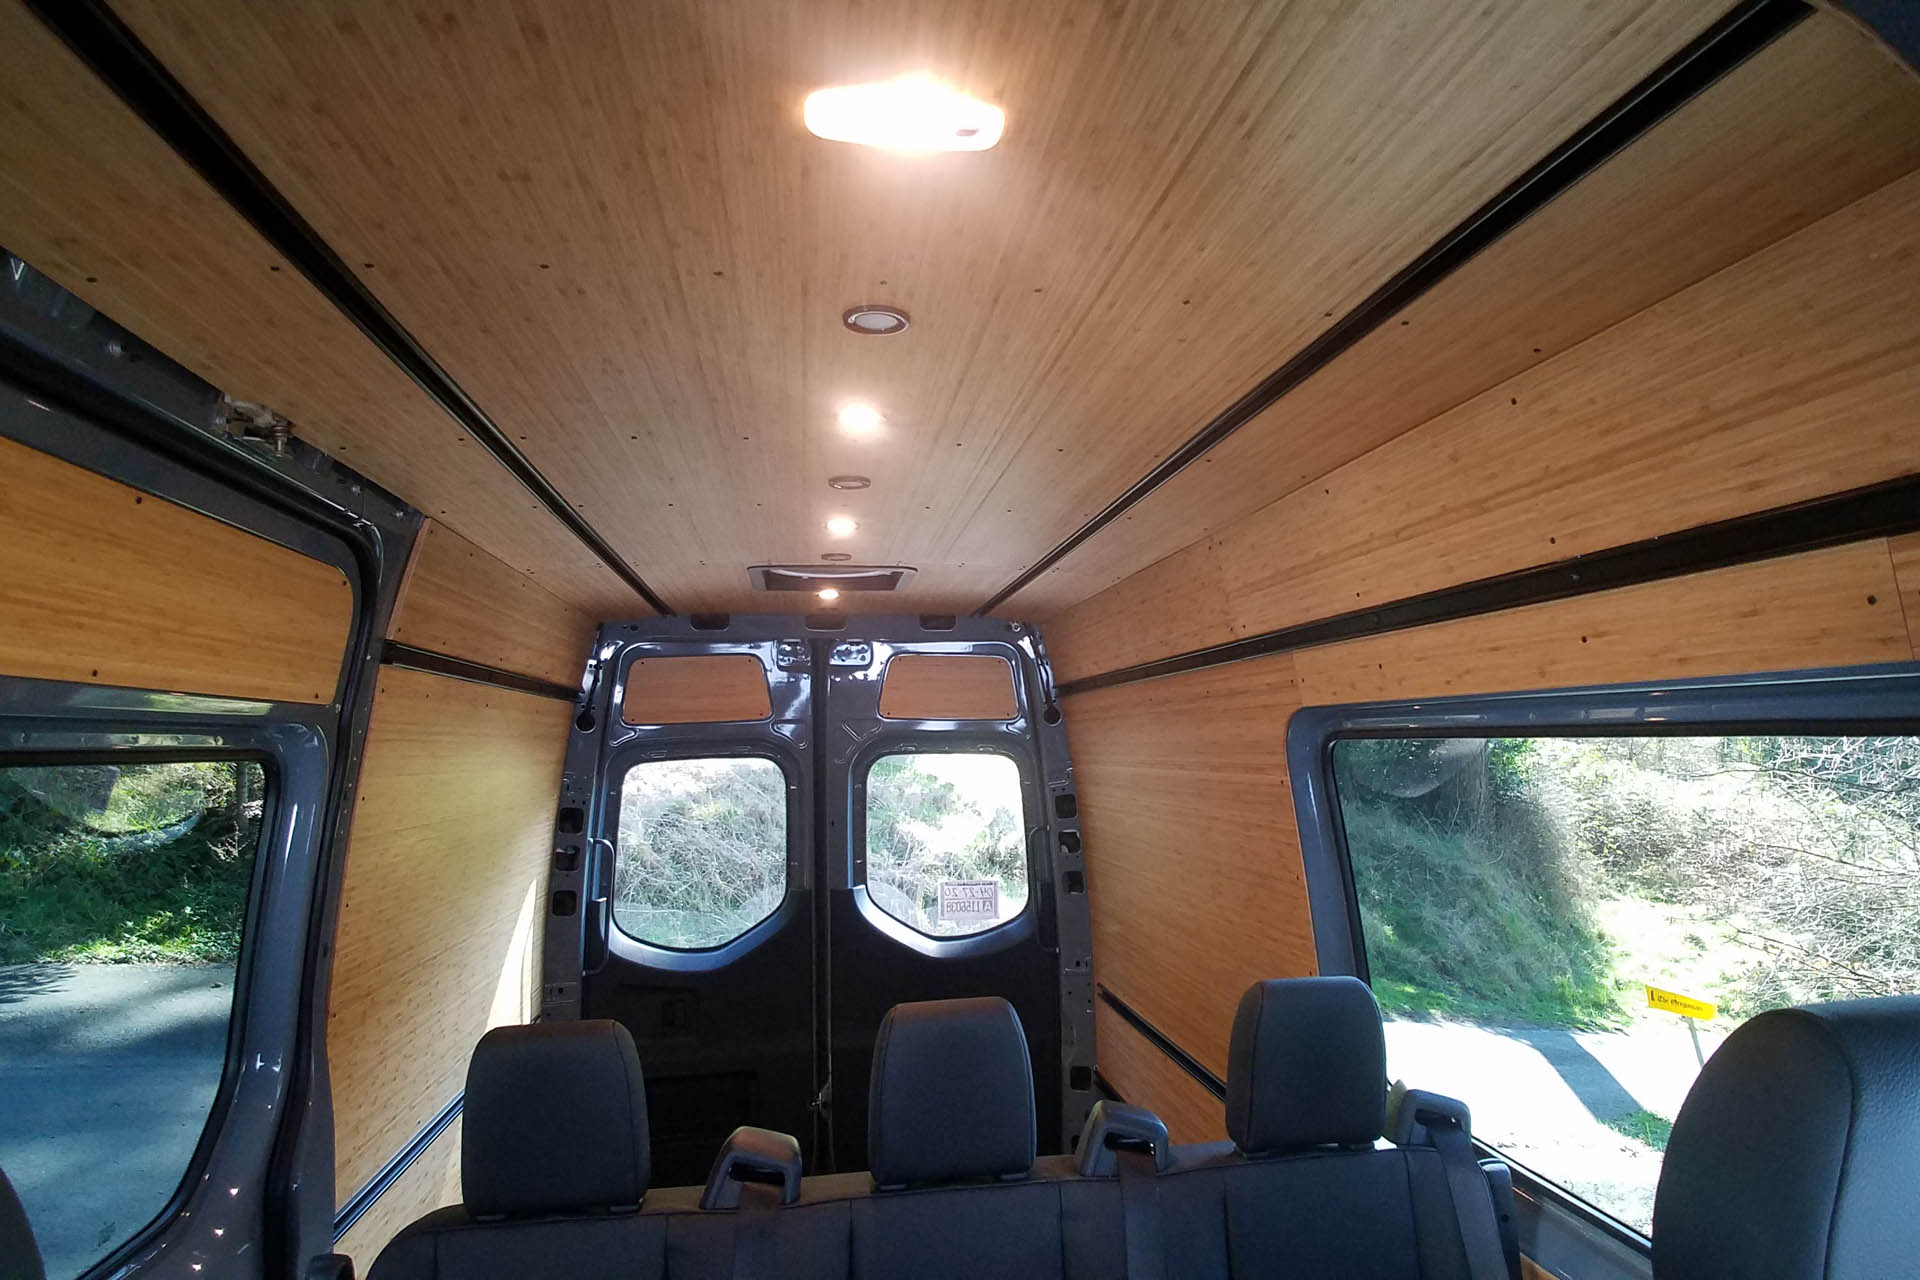
6 - Upper Wall & Ceiling Paneling
![]()
![]()
About:
This phase of the core build gives your van a finished look and is one of the most exciting transformations in the build process. Our signature paneling work is serviceable, beautiful, and affordable. In fact, this is one of the main reasons DIY customers bring us their vans from hundreds and even thousands of miles away for the core build phase of their projects. Once the core electric, mounting system, and paneling is in place, the van will have a finished look throughout the remainder of the build process, and/or future modifications. Simply put, after the paneling you should be able to finish the build, as well as make future modifications without ever needing to dig back down to the bare metal walls again.
Standard Package:
Installation of our Upper Paneling Kit consists of the wall above the window or window pocket line and includes the entire ceiling. It also includes the upper portion of the rear and slider doors when applicable. Perhaps the biggest benefit is Roost Vans trimming of the ‘B’ pillar plug. In order to cleanly address the ‘B’ Pillar at the transition point, the factory plugs are heavily modified and fabric wrapped for a professional finished look. For the ceiling, the most common option is Carbonized Vertical Grain 3-Ply Bamboo, finished with Osmo PolyX hard wax oil. However, fabric wrapped Baltic Birch is also available in many color options.
Ceiling lighting is addressed during the upper paneling installation. Factory lighting is typically repositioned and/or replaced with new LED puck lights when appropriate, and 3-6 dimmable user controlled puck lights are added (assuming your build also includes core electrical work and panel).
For passenger vans with a rooftop AC unit, the ceiling is dropped to accommodate the AC ducting and factory shroud is modified (see below).
Base Pricing – Bamboo (Most common):
- $3750 – Sprinter 144”
- $4150 – Sprinter 170″
- $4450 – Transit 148″
- $4750 – Transit 148″ Extended
Options & Addons:
- $200 – Fabric Wrapped Baltic Birch
- $1250 – Additional labor for 2019+ Sprinter passenger vans with factory rooftop AC unit (taken on a case by case basis)
- $375 – Required Transit rear wire covers frequently not provided by Ford without interior trim package
7 - Mid Wall Paneling
![]()
![]()
![]()
![]()
![]()
![]()
About:
This phase of the core build adds additional value by finishing out the mid sections of your van with frame panels and inset panels if needed. Once the core electric, mounting system, insulation and windows are in place, our Midwall Paneling Kit installation gives your van a more finished look.
Standard Package:
Installation of our Midwall Paneling Kit consists of the window area of the walls and doors between the Mounting System upper wall rail and mid wall rail. The Midwall Panel Kit is installed in either bamboo or fabric wrapped panels, and then finished with inset bamboo panels when there are no windows.
A note about passenger Vans: Most will have factory molded hard plastic around this area. We recommend retaining it. Our mounting system is designed to not require its removal, and therefore most passenger van builds require no mid paneling work other than fabric trimming of the door frames. The savings in the mid paneling area can offset the additional cost of the rooftop AC work of the upper mounting and ceiling paneling.
Slider & Rear Doorway Frame Treatments:
In our shop we sometimes cut and wrap small panels as applique’s for the rear doorway frame as needed, but do not fully fabric wrap the doorway frames. Full wrapping is available as an add on option.
Window Pocket Treatment Options:
- Inset Panels: Used to treat an area with no window or just pill windows. Installation of an inset Bamboo or Padded Fabric panel into the window pocket can maximize side to side sleeping width and provide a valuable aesthetic detail to the van.
- Pill Window Treatment: When an Inset Panel is chosen on a window pocket that has a ‘Pill Window’ installed, additional trimming around the pill window is performed.
Base Pricing
- $1400 – Sprinter 144 or Transit 148″ (Non Extended) in Fabric
- $1700 – Sprinter 170″ or Transit 148″ (Extended) in Fabric
- Window pocket treatment per window:
- Window Inset Panel – $350/ea for Fabric Wrappped or $550/ea for Bamboo
- Additional Pill Window Trimming: $575/ea
Options & Addons:
- $300 – Sprinter 144 or Transit 148″ (Non Extended) Bamboo Mid Wall Panel Kit
- $400 – Sprinter 170 or Transit 148″ (Extended) Bamboo Mid Wall Panel Kit
- $1950 Sprinter / $2175 Transit – Slider and rear doorway frames finished in fabric
- $650 per window – Fabric wrap of angled metal surface of window pocket
8 - Lower Wall Paneling
![]()
![]()
![]()
About:
This phase of the core build further gives your van a finished look. Our signature paneling work is serviceable, beautiful, and affordable. In fact, this is one of the main reasons DIY customers bring us their vans from hundreds and even thousands of miles away for the core build phase of their projects. Once the core electric, mounting system, and paneling is in place, the van will have a finished look throughout the remainder of the build process, and/or future modifications. Simply put, after the paneling you should be able to finish the build, as well as make future modifications without ever needing to dig back down to the bare metal walls again.
Standard Package:
Installation of our Lower Paneling Kit consists of the wall area below the window or window pocket line. The most common option is scuff resistant hard vinyl hex coin faced Baltic Birch for ease of cleaning and abrasion, but the lower paneling also includes options for fabric wrapping or bamboo.
Base Pricing – AntiSkid HexPly (Most common)
- $1500 – Sprinter 144” or Transit 148″ (Non Extended)
- $1750 – Sprinter 170″ or Transit 148″ Extended
Options & Addons:
- $400 for upgrade to Bamboo or Fabric Wrapped
- $200 for 170″ Extended
9 - Flooring
![]()
![]()
![]()
About:
Though flooring is a common element of a core build, it is not always necessary. Some vans have a perfectly suitable factory floor option installed or come standard. Usually though, all customers will benefit from adding additional insulation and sound deadening.
Standard Package:
If a new floor is needed, we will remove any existing flooring if present, such as the Transit soft floor, and build the floor from bare metal up. That consists of 100% coverage of 80 Mil mass loaded vinyl sound deadening material, closed cell foam insulation, and 1/2″ Baltic birch Anti Skid Hex Ply flooring.
If the existing floor is suitable, we’ll reuse it after pulling it insulating underneath as noted above.
In either case, we’ll retain any existing floor tie downs and reinstall preexisting factory trim if possible. If there is not factory trim available to be used, we’ll fabricate black powder coated metal trim to finish out the edges of the flooring.
Base Pricing – Full Floor
- $2975 – Sprinter 144 or Transit 148″
- $3350 – Sprinter 170″ or Transit 148″ Extended
- $3500– Sprinter 170″ Extended
Base Pricing – Insulate and replace
- $1150 – Sprinter 144″ or Transit 148″
- $1400 – Sprinter 170″ or Transit 148″ Extended
- $1500 – Sprinter 170″ Extended
Options & Addons:
- $495 pair of 4′ custom black L-Track Tie Downs
- $750 Sprinter Custom floor extension
10 - Heater
About:
We install Espar Diesel and Gas bunk heaters with integrated high altitude kits and variable speed fans.
Standard Package:
Our installations are a bit different than others. Having experience in fuel system design in the trucking industry, we properly route, secure and armor the fuel lines at installation. Then, we tap into the vehicles factory fuel tank port ensuring that the heater ‘stand pipe’ will always leave a few gallons in the tank. This, along with the low voltage cutoff, ensures that you will both have enough fuel and battery to start your vehicle and get home after your adventure.
The heater is controlled via an Espar EasyStart Pro Timer Thermostat Controller, which installs cleanly into the Roost Vans Power Panel Switch Plate. Typically the heater unit is installed under the front passenger seat, but custom installation options exist.
Both gas and diesel models are domestically sourced from our trusted vendors and will be servicable for years to come by authorized Espar service center in the states. This is not always the case with many ‘overseas’ Espar sale options.
Base Pricing: assumes a Roost Vans core wiring package is installed
- Espar D2L 2kw Diesel Bunk Heater Installed – $2995
- Espar B2L 2kw Gas Bunk Heater Installed – $3495
Common Add-Ons
There are a couple main build components that we do not consider part of the core build, but are commonly added to the core build for a variety of reasons:
- Bed System: Typically this is added to a core build when a customer is doing their build in multiple phases either for budgetary or scheduling reasons. The bed adds a lot of functionality in the interim.
- Storage Cabinets: Similar to the bed, a way to add a little functionality during the interim phase of a multiple build process.
Whatever the reason, individual components from the Main Build line of products can be easily added to a core build.